Hannah's DIY Art Station
While browsing around a yard sale the other day I came across this super-cute set of little chairs. The colors were pretty bad and they were not in great shape, but they were only priced $5. I grabbed them, and then convinced the seller to throw in an old plyboard table that was pretty rusted down the legs. Here is my $5.00 find:


Since there were significant cracks in the seats I filled them in as much as possible with wood glue, and then used clamps to squeeze them together over night.
Next I started with removing the old paint. First I made sure to do a lead test, to make sure I wouldn't be stirring up any lead dust. Once I knew we were clear of lead I applied the stripper. I had gone with a very gentle, non-toxic stripper, that was more of a paste than a liquid. On one hand this was good: no toxic fumes and no anti-agent needed. On the other hand: it wasn't very powerful and since it was pretty warm that week it dried on top of the paint in the narrow areas of the chair and proved very hard to remove. I ended up scrapping what I could, and then taking a Dremel tool with a sander tip to all of the beveled areas on the chair's back. This turned out to be WAY more labor intensive than I expected. I then used varying degrees of sandpaper to eventually work down (through what turned out to be 3 layers of very old paint), until I finally reached the original wood.
Once all the paint was off, I filled in any remaining cracks and unevenly sanded areas with wood putty. I re-sanded and re-puttied a few more times, until the surfaces were as even as I thought they might get. Then I applied a coat of spray paint primer. After the primer dried, I lightly sanded a few areas, then resprayed with pink and blue spray paint , then re-sanded and re-sprayed until, well...basically until the cans were empty, lol.
For the table, I began with some scrunched up aluminum foil dipped in water and began to rub the rust off of the legs. This worked pretty well, but the metal was not nearly as pretty as I wanted it. I had an old can of silver spray paint so I hit the legs with a few coats.
Wandering through a thrift store the next day, I came upon a poster with a map of the US for 99 cents. It has some weird promotional border, so I cut those off. Using some free tourist maps of our town I had picked up a few months back, I Modpodged the maps to the table.
I used the "hard drying" Modpodge, so that it would stand up to the kids. It came out more wrinkly than I would have liked, but after a few coats and a little sanding it was ...just as wrinkly...hmmm. Perhaps Modpoge was not the ideal product in this situation.
Anyway, I thought it looked cute, if not 100% perfect.
Next I decided that the kids had to have somewhere to hang pictures, and I remembered this cute idea I had seen on Pinterest for a way to hang kids art using a piece of wood that had been painted. I tried to find it, to make sure the original Pinner received credit, but the link was no longer valid...and I ended up putting my own spin on it anyway.
I went to the local hardware store and purchase two pieces of wainscoting trim for 97 cents apiece! I spray painted them to match the chairs. I then inserted some clear push pins I had lying around. I bought a container of binder clips ($1.57) and hit them with some of the left over silver paint from the table. Since I am renting, I was unsure about how I could attach them to the wall until the GENIUS guy at the hardware store suggested Velcro! Brilliant!!! 3M makes Command Strips with Velcro on them! It was truly perfect. I can remove them from the wall when we move without any damage, and if the kids pull one down while trying to hang there own art I can just Velcro it back up.
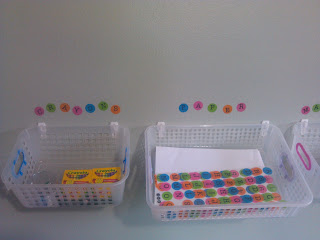
Stopping at Joanns one day for something completely different, I happened upon some plastic baskets on clearance for $1.87 each and I snatched up 3. Then at the end of the isle there was MORE COMMAND STUFF! They actually had a packet of mini hooks. (Am I the last person on the planet to discover how amazing these things are?!?) I love that the kids can take down the crayons or markers, and then clean up fast by just scooping stuff back in the baskets and hanging them back on the wall. And on my way to the check out I discovered these cute typography stickers in my actual color theme (and also on clearance!)
So here is the final product all put together, just in time for Hannah's birthday. The kids love it, and have been making art every day. (And I sneak in, just to pat myself on the back.)
So here is my final total:
Chairs and table: $ 5.00
2 cans of spray paint: $ 7.34
Paint remover: $ 6.99
Map $ 0.99
2 pieces of trim $ 1.94
Binder clips $ 1.57
sand paper $ 2.99
Modpodge $ 4.87 (after coupon)
Command velcro $ 3.22 (after coupon)
Command hooks $ 2.87 (after coupon)
Letter stickers $ 1.87 (clearance)
3 Baskets $ 5.61 (clearance)
Grand total: $ 45.26
(Wood glue, wood putty, push pins, silver paint, primer, town maps, and Dremel were all things I had laying around my own garage. )


No comments:
Post a Comment